Labelについての考察
Labelコントロールについての考察です
Labelにアイコンを設定する
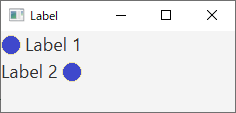
Labelにはアイコンを設定することができます。設定方法「コンストラクタで設定する方法」と「setGraphic」で設定する方法がある。また文字列に対してのアイコン位置を上下左右で設定することが可能です。
- 1 :
2 :
3 :
4 :
5 :
6 :
7 :
8 :
9 :
10 :
11 :
12 :
13 :
14 :
15 :
16 :
17 :
18 :
19 :
20 :
21 :
22 :
23 :
24 :
25 :
26 :
27 :
28 :
29 :
30 :
31 :
32 :
33 :
34 :
35 :
36 :
37 :
38 :
39 :
40 :
41 :
42 :
43 :
44 :
45 :
46 :
47 :
48 :
49 :
50 :
51 :
52 :
53 :
54 :
55 :
56 :
57 :
58 : -
import javafx.application.Application;
import javafx.scene.Scene;
import javafx.scene.control.ContentDisplay;
import javafx.scene.control.Label;
import javafx.scene.image.Image;
import javafx.scene.image.ImageView;
import javafx.scene.layout.VBox;
import javafx.scene.text.Font;
import javafx.stage.Stage;

public class JavaFX_Label1 extends Application{

	public static void main(String... args){

		Application.launch(args);

	}

	public void start(Stage stage) throws Exception {


		// アイコンとする画像を取得
		Image image = new Image(getClass().getResourceAsStream("image/mark0.png"));

		ImageView imageView1 = new ImageView();
		imageView1.setImage( image );

		ImageView imageView2 = new ImageView();
		imageView2.setImage( image );


		// Lableを作成 → コンストラクタでアイコンと文字を両方設定
		Label label1 = new Label("Label 1", imageView1);
		label1 . setFont(new Font( 18 ));                // フォントを18ptに設定
		label1 . setContentDisplay(ContentDisplay.LEFT); // アイコンの位置を左側に設定


		// Lableを作成 → コンストラクタで文字のみ設定
		Label label2 = new Label("Label 2");
		label2 . setFont(new Font( 18 ));                 // フォントを18ptに設定
		label2 . setContentDisplay(ContentDisplay.RIGHT); // アイコンの位置を右側に設定
		label2 . setGraphic( imageView2 );                // アイコンを設定


		VBox vbox = new VBox();
		     vbox . getChildren() . add( label1 );
		     vbox . getChildren() . add( label2 );


		stage . setTitle( "Label" );
		stage . setWidth(  250 );
		stage . setHeight( 120 );
		stage . setScene( new Scene( vbox ) );
		stage . show();

	}

}
【 サンプルソース No.1 Label 】
実行結果

アイコン位置の設定は下記のコードで設定する
- 1 :
2 :
3 :
4 : -
setContentDisplay(ContentDisplay.TOP);    // アイコンの位置を上に設定
setContentDisplay(ContentDisplay.BOTTOM); // アイコンの位置を下に設定
setContentDisplay(ContentDisplay.LEFT);   // アイコンの位置を左に設定
setContentDisplay(ContentDisplay.RIGHT);  // アイコンの位置を右に設定
Labelを他のノードにバインドする
Labelを他のノードにバインドして「表示内容を動的に変更する」ことが可能です。下記のサンプルソースでは、LabelへTextFieldの入力値をバインドしています。
- 1 :
2 :
3 :
4 :
5 :
6 :
7 :
8 :
9 :
10 :
11 :
12 :
13 :
14 :
15 :
16 :
17 :
18 :
19 :
20 :
21 :
22 :
23 :
24 :
25 :
26 :
27 :
28 :
29 :
30 :
31 :
32 :
33 :
34 :
35 :
36 :
37 :
38 :
39 :
40 :
41 :
42 : -
import javafx.application.Application;
import javafx.scene.Scene;
import javafx.scene.control.Label;
import javafx.scene.control.TextField;
import javafx.scene.layout.VBox;
import javafx.scene.text.Font;
import javafx.stage.Stage;

public class JavaFX_Label3 extends Application{

	public static void main(String... args){

		Application.launch(args);

	}

	public void start(Stage stage) throws Exception {


		// Lableを作成
		Label label = new Label("");
		      label . setFont(new Font( 18 ));

		// TextFieldをバインド
		TextField textField = new TextField();
		          textField.setMaxWidth(200);

		VBox vbox = new VBox();
		vbox.getChildren().addAll(label,textField);

		// Labelに、TextFieldの入力値をバインド
		label.textProperty().bind(textField.textProperty());

		stage . setTitle("Label");
		stage . setWidth(  500 );
		stage . setHeight( 100 );
		stage . setScene( new Scene( vbox ) );
		stage . show();

	}

}
【 サンプルソース No.2 Labelにバインド 】
実行結果

TextFieldの入力値をバインドしている箇所
- 31 :
33 : -
// Labelに、TextFieldの入力値をバインド
label.textProperty().bind(textField.textProperty());
他ノードとの関連付けと、ニーモニック
Labelは他のノードに関連付けることが可能です。Labelにニーモニックを設定すると、関連付けられたノードにフォーカスが移動します。 ※ニーモニック … 割り当てられるているキーのこと
- 1 :
2 :
3 :
4 :
5 :
6 :
7 :
8 :
9 :
10 :
11 :
12 :
13 :
14 :
15 :
16 :
17 :
18 :
19 :
20 :
21 :
22 :
23 :
24 :
25 :
26 :
27 :
28 :
29 :
30 :
31 :
32 :
33 :
34 :
35 :
36 :
37 :
38 :
39 :
40 :
41 :
42 :
43 :
44 :
45 :
46 :
47 :
48 :
49 :
50 :
51 :
52 :
53 :
54 :
55 :
56 :
57 : -
import javafx.application.Application;
import javafx.scene.Scene;
import javafx.scene.control.Label;
import javafx.scene.control.TextField;
import javafx.scene.layout.HBox;
import javafx.scene.layout.VBox;
import javafx.scene.text.Font;
import javafx.stage.Stage;

public class JavaFX_Label2 extends Application{

	public static void main(String... args){

		Application.launch(args);

	}

	public void start(Stage stage) throws Exception {

		TextField text1 = new TextField();
		TextField text2 = new TextField();

		// Lableを作成
		Label label1 = new Label( "入力1(_a):" );  // ニーモニックのキー指定(a)を設定
		      label1 . setFont( new Font( 18 ) );
		      label1 . setLabelFor( text1 );         // text1と関連付け
		      label1 . setMnemonicParsing( true );   // ニーモニック解析 有に設定

		Label label2 = new Label( "入力2(_b):" );  // ニーモニックのキー指定(b)を設定
		      label2 . setFont( new Font( 18 ) );
		      label2 . setLabelFor( text2 );         // text2と関連付け
		      label2 . setMnemonicParsing( true );   // ニーモニック解析 有に設定

		HBox hbox1 = new HBox();
		hbox1 . getChildren() . add( label1 );
		hbox1 . getChildren() . add( text1  );


		HBox hbox2 = new HBox();
		hbox2 . getChildren() . add( label2 );
		hbox2 . getChildren() . add( text2  );


		VBox vbox = new VBox();
		vbox . getChildren() . add( hbox1 );
		vbox . getChildren() . add( hbox2 );


		stage . setTitle( "Label" );
		stage . setWidth(  300 );
		stage . setHeight( 100 );
		stage . setScene( new Scene( vbox ) );
		stage . show();

	}

}
【 サンプルソース No.3 Labelの関連付けとニーモニック 】
実行結果

altキー + 割り当てキー(上記の例では「a」または「b」) でフォーカスが関連付けられたTextFieldに移動する。
ニーモニック文字を指定している箇所。「_」に続く文字が割り当てられるキーとなる。
- 24 :
29 : -
Label label1 = new Label( "入力1(_a):" );  // ニーモニックのキー指定(a)を設定
Label label2 = new Label( "入力2(_b):" );  // ニーモニックのキー指定(b)を設定
TextFieldとの関連付けをしている箇所
- 26 :
31 : -
label1 . setLabelFor( text1 );         // text1と関連付け
label2 . setLabelFor( text2 );         // text2と関連付け
ニーモニック解析 有に設定している箇所
- 27 :
32 : -
label1 . setMnemonicParsing( true );   // ニーモニック解析 有に設定
label2 . setMnemonicParsing( true );   // ニーモニック解析 有に設定